
Web Responders
The information in this article is an advanced topic within the NetSapiens platform. Please note that assistance for this article is outside NetSapiens support. If taking a look at application code examples would be helpful, be sure to check out https://github.com/netsapiens/netsapiens-webresponder-examples
What are Web Responders?
Web Responders (To Web) is an available responder application in all NetSapiens-supported versions. It can be invoked for both incoming and outgoing calls, and it allows developers full control over the call flow, including the use of media.
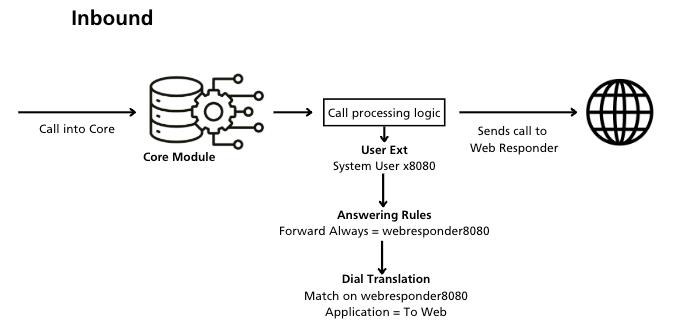
The process originates from a call, either from an endpoint or the API. The call is routed through the Core Module. Call Processing configurations then direct the call to the Web Responder. For example, the call may route to a specific system user’s Answering Rules and finally match via a Dial Translation to the Web Responder. The Web Responder contains an XML script allowing it to communicate actions with the Core Module.
The code responsible for driving the call can be any tailored program/code created by your developer, so long as its response is as an XML script. For instance, the developer could create a program that directs incoming calls to a CRM, which is something that’s not possible to do from a NetSapiens Dial Plan alone.
The Web Responder’s job ends after there are no more actions. If there are multiple actions involved (verbs), then the Core Module will keep going back to the Web Responder until there are no more.
Reference
NetSapiens provides Web Responder examples on GitHub. https://github.com/netsapiens/netsapiens-webresponder-examples
Definitions
To-Web: This is the application used in a Dial Translation to send a call to a Web Responder. Simply select To-Web and enter the Web Responder's URL and any other configuration in the Application Parameter field.
uid: Whether the call is being forwarded on-net or off-net, you need to supply the "uid" which is the "owner" of the call.
Taking Ownership of the Call
Through System User
For Web Responder verbs to work as expected, we recommend routing calls through a system user rather than sending calls straight to Web Responder. This is crucial when using the <forward> verb.
For inbound calls from an off-net number, the call flow should be routed through a user or (ideally) a system user in order to assign ownership for that call leg; otherwise, the number would come in via the carrier and be forwarded to the Web Responder application straight from the DID table, without ever connecting to a user. This would skew call limit data and statistics because nobody has taken ownership of the call. Connection limits would still apply.
Furthermore, if there is no owner, then certain operations such as forwarding would not work. The Core Module needs an owner for certain call flows. This setup is not exclusive to Web Responders. This also applies to call queues, conferences, etc. In each of these call flows, the call must be directed through a subscriber (user).
Directly to Web Responder
Although we recommend routing the call through a system user for many reasons, the other option is to send the call directly to Web Responder. In this case, when a <forward> verb is used within the Web Responder's XML, the "By Caller" attribute (v43.2+) should be included to specify a call owner.
Note: This is not the recommended configuration. We highly recommend following the guidance in the previous section instead ("Through System User").
ByCaller (v43.2+, NMS-2485) specifies using the caller's Dial Plan (instead of the callee's) in the Web Responder script. Without this attribute, the inbound call has to route through a user first in order to use their Dial Plan. To use this method, follow these instructions:
- Add the "ByCaller" attribute to Forward.
- User sets forward to Web Responder.
- The caller dials directly into the Web Responder. The forward will work as expected.
Inbound vs. Outbound Behavior
Received Calls (Inbound)
You can direct inbound calls to a Web Responder application by routing to a system user and then forwarding to a Dial Plan entry that selects the "To Web" application. To-Web specifies a single parameter, which is the URL of the Web Responder application. IVR flow control is then passed to the Web Responder application via that URL.
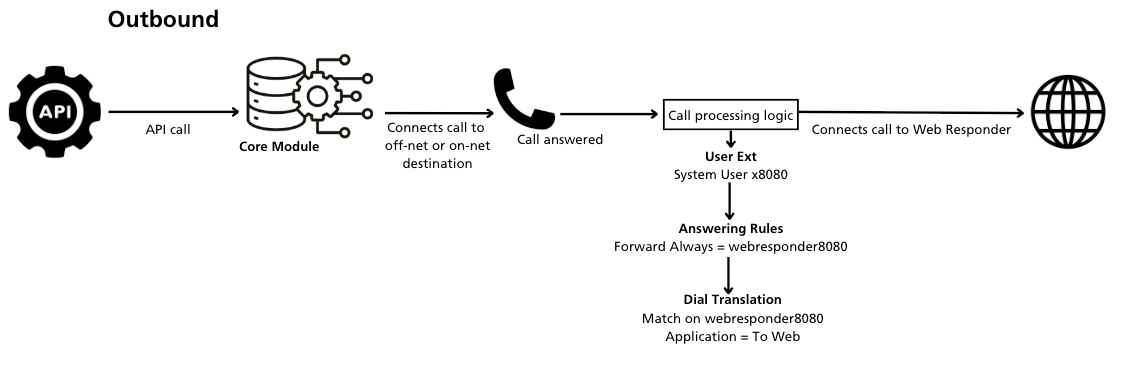
Generated Calls (Outbound)
Web Responders act similarly to call queues for outbound calls. Something must initiate the call. For call queues, an agent can dispatch a call. But for Web Responders, it’s the API’s job to initiate the call.
- Make the API call. Instructions are located here, https://docs.ns-api.com/v45.0/reference/post_domains-domain-users-user-calls
- The Core Module answers.
- The Core Module dispatches the call to where the API requested (the destination), which in this scenario is the Web Responder, along with a set of parameters that are posted every time the Core connects to the Web Responder.
URL Parameters Provided by the Core Module
When the Core Module posts back to the Web Responder application, the URL may contain the below parameters (regardless if it is inbound or outbound). A list of parameters is sent every time it connects to the Web Responder.
| URL Parameter | Example |
|---|---|
| NmsAni | caller (e.g. "1001") |
| NmsDnis | callee (e.g. "2125551212") |
| AccountUser | the account user |
| AccountDomain | the account domain |
| AccountLastDial | last dialed digits by the account user |
| Digits | received digits |
| OrigCallID | call ID of the Orig leg |
| TermCallID | call ID of the Term leg |
| ToUser | the user input to the responder |
| ToDomain | the domain input to the responder |
Configurations
Example Scenario
This is an example of a "math" application. The application prompts the caller for two numbers and says the sum. The application demonstrates (a) a multi-step application and (b) storing state in a server side php session. For this application to function, you must also create a file in http://localhost/tts.php and setup an account with a tts service.

HTTP Tokens
Certain call flows may require an extended XML payload in the body, and in such cases an HTTP POST is industry standard for such actions. When configuring the Dial Translation in the Admin UI, you can use the Dial Translation Token "HttpMethod" to specify a POST verb in your call to your Web Responder application, like so:
<HttpMethod=POST>More information on Dial Translation Tokens (including the other HTTP token "HttpSecret") can be found here: Dial Translation Tokens
More information in the form of an overview on Dial Translations themselves in the NetSapiens system can be found here: Dial Translations Overview
Verbs
Verbs usually take an "action" attribute. If the "action" attribute is present, then control is returned to the URL given by the "action" attribute. If not present, then the application ends.
There are many actions that exist, but the following verbs are the only supported ones at this time.
Supported Verbs Prior to v44.1
Forward
The <Forward> action forwards to the given destination. The <Forward> verb does NOT take an "action" parameter. It is effectively a "goto".
<Forward>
  2125551212
</Forward>| Forward Attribute | Description |
|---|---|
| ByCaller | (v43.2+, NMS-2485) Specifies using the Caller's Dial Plan (instead of the Callee's) in the Web Responder script. Without this attribute, the inbound call has to route through a user first in order to use their dial plan, and the destination isn't as expected. |
Here are ByCaller instructions:
- Add the "ByCaller" attribute to Forward.
<Forward ByCaller='yes'>+141625[redacted]</Forward> - User sets forward to web responder.
- The caller dials directly into the web responder. The forward will work as expected.
CNmsUaSessionStateMsgInfoTest(20230130154940025425)('ByCaller','exist') - MsgInfo
<ByCaller> exist
LookupResponder(sip:ByCaller@Forward)
- Found mode=(forward_call)
LookupNextResponder case(1)
Translate
from
    <Forward@>
by   (ByCaller)(Forward)
to   (sip:ByCaller@Forward)(sip:ByCaller@Forward)
Gather
The <Gather> action gathers the given number of DTMF digits and posts back to the given action url, optionally playing the given .wav file.
In this example, it gathers 3 digits and posts back the relative URL "handle-account-number.php?Digits=555":
<Gather numDigits='3' action='handle-account-number.php'>
  <Play>
    http://www.example.com/what-is-your-account-number.wav
  </Play>
</Gather>| Gather Attribute | Description |
|---|---|
| numDigits | This is the number of digits to gather (such as '1') (default=20) |
| Digits | The <Gather> verb posts back to the given action URL with the gathered digits (such as 123). |
Play
The <Play> action plays the given .wav file and posts back (returns control) to the given action URL. (must be in WAV format).
In this example, it plays the WAV file and then posts back to continue.php. To end the call, omit the action parameter:
<Play action='continue.php'>
  http://www.example.com/hello-world.wav
</Play>
Supported Verbs in v44.1+
The following verbs have either been added or been given enhanced functionality starting in SNAPsolution v44.1. No functionality has been removed from verbs. This release is a feature enhancement, and your existing verbs will not break.
:::warning Prerequisites
- SNAPsolution v44.1
- A Voice Services integration is required for these enhancements to work as expected. Deepgram is the recommended vendor in order to utilize all available voice attributes.
:::
Response
The <Response> verb is designed to enhance the efficiency and structure of XML responses. By allowing multiple verbs to be encapsulated within a single <Response> element, this verb simplifies call control, eliminating the need for multiple requests to perform multiple sequential actions.
Previously, executing multiple verbs required individual requests. Now, with the introduction of the <Response> verb, developers can streamline call flows by listing multiple verbs under a single request. As the call progresses, the Core Module will sequentially move through the verbs listed within the <Response> element, executing each one in the order specified. Call control will move to the first action listed, or if it reaches the end, then it will disconnect the call since the <Response> is finished.
Here is an early exit example. The third <Say> won't execute because the call flow will be transferred to "next.php" specified by the action at the second <Say>.
<Response>
  <Say>This is Say XML tag 1 encapsulated in response tag</Say>
  <Say action='next.php'>This is Say XML tag 2 with action attribute encapsulated in response tag</Say>
  <Say>Call control has been transferred to "next.php" so this line will never execute</Say>
</Response>
Echo
The <Echo> verb allows for real-time audio feedback, enabling immediate playback of user input to facilitate testing. For instance, it might be used to immediately return received audio or input back to the sender. This could be used for testing or feedback purposes within a voice application. If a user says something, the system could use "Echo" to play back the user's words verbatim. If the timeout is not configured, then the "echo" will continue until the user hangs up.
<Echo timeout="5"></Echo>| Echo Attribute | Description |
|---|---|
| timeout | For an "Echo" verb, this attribute controls for how many seconds the system will keep echoing the media back to the caller. It defaults to 0, which means unlimited, and the caller will have to drop the call. Timeout is configured in seconds ("5" means 5 seconds). |
Say
The <Say> verb instructs the system to convert text into speech during a phone call, so that the caller hears the text as spoken words. It uses TTS to convert text to audio sentences.
This verb relies on the API and the Voice Services integration to convert the sentence to audio for playback. Refer to the NetSapiens knowledge base article for enabling the configs for speech collection and configuring a vendor, How Do I Configure and Use Text-To-Speech? Note that Web Responders default to the value of these configs its system user is set to, and can inherit from domain or system level in case they are absent.
<Say>Hello, this is a simple text-to-speech message.</Say>| Say Attributes | Description |
|---|---|
| voice | This attribute controls the voice used for a "Say" verb. It accepts either a gender (male, female), a voice name, or voice id. Be careful using a voice ID if you also set language. If you choose a voice ID AND language that do not match, then the system will default back to the default voice for your domain. |
| language | BCP-47 language code. Like en-US, pt-BR, fr-CA. |
Gather (Enhanced)
The <Gather> verb already existed, but it can now also collect speech transcripts via voice (along with pressed digits).
On a technical level, this verb instructs the system to collect dtmf, speech, or both. If dtmf is specified and dtmf is collected, then a request will be sent with "Digits" param back. If speech is specified, then it is collected through speech_cmd and a request is sent back with the transcript in "SpeechResult".
<Gather input='dtmf speech' action='process_action.php'>
  <Say language='en-US' voice='amy'>
    Hi, how can I help you today?
  </Say>
</Gather>
<Gather> can contain nested verbs like <Say> or <Play> that can execute while the system is gathering speech or dtmf.
It relies on the API and the Voice Services integration to convert the sentence to audio for playback. We recommend that you use Deepgram as your default vendor to utilize all of the available voice attributes. Refer to the NetSapiens knowledge base article for enabling the configs for speech collection and configuring a vendor, How Do I Configure and Use Speech Recognition? Note that Web Responders default to the value of these configs its system user is set to, and can inherit from domain or system level in case they are absent.
| Gather Attributes | Vendor | Description |
|---|---|---|
| numDigits | any | Max number of DTMF digits expected to collect |
| input | any | Specify input type. Add "speech" and/or "dtmf" to collect an audio transcript and/or a sequence of DTMF digits. |
| hints | any | Provide hints of possible words, that are expected to be captured in the transcript. This attribute is especially useful for a directory; providing a list of expected last names will increase accuracy. |
| timeout | any | DTMF input timeout |
| digitEndTimeout | any | Sets the maximum time interval between successive DTMF digit inputs |
| language | any | Language code used on speech collection. |
| model | deepgram | Used to specify the model to use for speech collection. |
| smartFormat | deepgram | Specify if the transcript should be formatted. This will attempt to format dates, times, phone numbers, URLs, paragraphs, punctuation, and so on. Without Smart Format, a transcript may look like this: "hi its me its five thirty five am and im just calling to say hello". After Smart Format, it will look more like this: "Hi, it's me. It's 5:35 AM, and I'm just calling to say hello." |
| numerals | deepgram | Enables/Disables conversion from numbers as words to number in the transcript. For instance, "nine hundred" would be converted to "900" in the transcript if numerals is enabled. |
Hangup
The <Hangup> verb hangs up the call. You can't nest any verbs within it, and it can only be nested within a <Response>.
<Response>
  <Hangup/>
</Response>
Stream
The <Stream> verb bidirectionally streams media in & out via a WebSocket server in near real-time. Developers can both intercept and inject live audio, making it invaluable for applications requiring real-time audio processing, such as AI-driven analysis and interactive voice response systems.
Stop a Stream
Through the WebSocket, the application can send a stop event to close the stream. Upon receiving a "stop" event, the <Stream> will stop transmitting. If it is a Sync stream, then it will exit and proceed to the next WebResponder action.
{
  "event": "stop"
}
:::info
There are two ways to start a Stream: asynchronous (listen only) & synchronous bi-directional (transmit & listen).
:::
Asynchronous Stream
When used within a "Start" verb, then "Stream" enables asynchronous audio streaming. It's NOT bidirectional. It's only in one direction. This allows the call to proceed while audio is being transmitted. Asynchronous audio is streamed to the WebSocket URL.
In the following example, audio is streamed to wss://example.com/audio while the call continues with the next instruction, preventing call interruption. If no further instructions are provided, the call may be disconnected; therefore, it is advisable to include subsequent WebResponder instructions to continue the call session.
<Response>
  <Start>
    <Stream name="my_stream" url="wss://example.com/audio" />
  </Start>
  <Say>This will execute after connecting the stream</Say>
</Response>
Stopping an Asynchronous Stream
If a unique name was used to start the asynchronous stream, then the stream can be stopped at any time by providing its name within a "Stop" verb, like so:
<Response>
  <Stop>
    <Stream name="my_stream"/>
  </Stop>
</Response>
Synchronous Bi-directional Streaming
For applications requiring synchronous bi-directional streaming where you might need to send audio back to the call or interact with the caller based on the streamed audio, you should use the "Stream" verb within the "Connect" verb. This facilitates a two-way audio stream between the call and your application, enabling interactive scenarios.
<Connect>
  <Stream url="wss://example.com/audio"></Stream>
</Connect>| Stream Attributes | Description |
|---|---|
| url | The WebSocket URL where the audio stream will be sent. Ensure this URL uses a secure (wss) protocol and can handle WebSocket connections. |
| track | This specifies which audio track to stream. There are 3 possible values: inbound (incoming audio), outbound (outgoing audio), and both (both tracks). inbound: this value indicates that only the audio coming into the Core Module from the external party (e.g., the caller's voice) is included in the stream. Use this setting if you are only interested in analyzing or processing what the caller says. outbound: this value indicates that only the audio being sent from the Core Module to the external party (e.g., the agent's voice) is included in the stream. Select this option if your focus is on what the agent or automated system says to the caller. both: this setting streams both inbound and outbound audio tracks. It is useful for full conversation analysis, such as enabling applications to process and analyze the entire dialog between the caller and the agent or automated system. |
| name | An optional identifier for the stream, useful for distinguishing between multiple streams in your application. |
Custom Parameters
Custom parameters can be added to the "Stream" verb to pass additional information to the WebSocket server. These parameters are sent with the "start" WebSocket event and can be used to provide context or session-specific data.
In this example, customerID and callType are passed along with the audio stream, allowing the server to tailor the processing based on these parameters. These parameters allow for the transmission of contextual information or session-specific data to the receiving application, enhancing the call's processing and analysis.
<Stream name="word_detection" url="wss://example.com/audio" track="both">
  <Parameter name="customerID" value="12345" />
  <Parameter name="callType" value="support" />
</Stream>| Parameter Attributes | Description |
|---|---|
| name | The parameter's name, acting as the key in the key-value pair sent to the endpoint. |
| value | The parameter's value, acting as the value in the key-value pair. |
:::info Life Cycle of a <Stream> Verb
In the life cycle of a "Stream", there are several types of events represented through WebSocket messages: Connected, Start, Media, and Stop. Each message sent over the WebSocket is a JSON string. The event property within each JSON object identifies the type of event occurring.
:::
Connected Message
The Connected message is the first to be sent once a WebSocket connection has been established. Its attributes are:
- event: a string value "connected" indicating the establishment of the connection
- version: indicates the semantic version of the protocol
{
  "event": "connected",
  "version": "1.0.0"
}
Start Message
Sent immediately after the Connected message, the Start message contains essential information about the Stream and is dispatched only once. Its attributes are:
- event: a string value "start"
- sequenceNumber: tracks the order of message delivery, starting with "1"
- start: an object containing Stream metadata such as stream_id, call_id, expected tracks, customParameters, and mediaFormat.
{
  "event": "start",
  "sequenceNumber": "1",
  "start": {
    "stream_id": "2d9be7d7-4a66-4667-b2e1-cf3fa4e66306",
    "call_id": "vmj74pd5nmm9jlukvbfg",
    "tracks": [
      "inbound",
      "outbound"
    ],
    "customParameters": {
      "client_id": "123123123",
      "status": "1"
    },
    "mediaFormat": {
      "encoding": "audio/x-mulaw",
      "sampleRate": 8000,
      "channels": 1
    }
  }
}
Media Message
A Media message encapsulates the raw audio data within the stream. Its attributes are:
- event: a string value "media"
- sequenceNumber: increments with each new message
- media: contains the audio payload and additional metadata like track, chunk and timestamp
- chunk: this attribute signifies the sequence of the audio packets being sent on that track. The first message will start with chunk "1" and increment with each subsequent message. This sequential numbering helps ensure that audio frames are processed in the correct order, maintaining the integrity of the conversation.
- timestamp: this represents the presentation timestamp of each audio chunk relative to the start of the stream, in milliseconds.
{
  "event": "media",
  "sequenceNumber": "3",
  "media": {
    "track": "outbound",
    "chunk": "1",
    "payload": "base64AudioData",
    "timestamp": "1708388604"
  }
}
Stop Message
A Stop message indicates the termination of the Stream or the end of the call. Its attributes are:
- event: a string value "stop"
- sequenceNumber: increments with each new message
- stop: contains metadata about the Stream session
- bytesSent: this indicates the total amount of data transmitted during the stream for each enabled track.
- duration: This reflects the total duration of the audio stream for each track, typically measured in seconds.
{
  "event": "stop",
  "sequenceNumber": "416",
  "stop": {
    "tracks": [
      {
        "type": "inbound",
        "bytesSent": 66240,
        "duration": 8
      },
      {
        "type": "outbound",
        "bytesSent": 99114,
        "duration": 10
      }
    ],
    "call_id": "24j83iflgottdokd39vt",
    "stream_id": "6ccf2088-6755-4861-a162-3c6c30d6ad07"
  }
}
Wait
The <Wait> verb can be used to include configurable pauses within a call flow. It instructs the system to pause for a specified duration before proceeding with the next instruction in the sequence. This can be particularly useful for creating delays within voice interactions, such as spacing out verbal prompts to make them easier for the user to understand. If a wait timeout is not configured, then the system will default to waiting 1 second.
<Wait timeout="5"></Wait>| Wait Attribute | Description |
|---|---|
| timeout | For a "Wait" verb, this attribute controls for how many seconds the Core Module will wait before executing the next step. It defaults to 1, which means it will wait 1 second. |
Example Use Cases
See NetSapiens WebResponder Examples on GitHub for more examples.
echo (without a timeout)
<Echo/>echo (with a timeout)
<Echo timeout="15"></Echo>wait (without a timeout)
<Wait/>wait (with a timeout)
<Wait timeout="5"></Wait>wait (with a timeout) within a response
<Response>
  <Say>Hold on, we are connecting your call.</Say>
  <Wait timeout="5"/>
  <Say>Thank you for waiting.</Say>
</Response>
echo & wait together within a response
<Response>
  <Say>Wait for 5 seconds and test your microphone and speaker by talking to yourself after the tone</Say>
  <Wait timeout='5'></Wait>
  <Echo timeout='15'></Echo>
</Response>
say
<Say>Hello, this is a simple text-to-speech message.</Say>gather speech & say in the appropriate language
<Gather input='dtmf speech' action='process_action.php'>
  <Say language='en-US' voice='amy'>
    Hi, how can I help you today?
  </Say>
</Gather>
gather DTMF digits and send to "ivr.php"
<Gather numDigits="1" action="ivr.php"></Gather>gather 10 digits and send to "account.php", play an audio that requests the account number
<Gather input="dtmf" numDigits="10" action="account.php">
  <Play>https://myhost.com/enter-your-account-number.wav</Play>
</Gather>
gather 1 digit DTMF and use TTS
<Gather numDigits="1" action="next.php">
  <Say voice="female">Enter one to continue</Say>
</Gather>
play greeting, gather 1 digit DTMF, and say audio
<Response>
  <Play>Welcome to NetSapiens</Play>
  <Gather numDigits="1" action="ivr.php">
    <Say voice="female">Enter 1 or say sales to connect to sales, enter 2 or say support to connect to support</Say>
  </Gather>
</Response>
gather speech, say a different language
<Gather input="speech" hints="Thiago Vicente" language="pt-BR" action="ivr.php">
  <Say voice="male" language="pt-BR">Olá, com quem você gostaria de falar?</Say>
</Gather>
gather speech, use a custom format, say audio
<Gather input="speech" model="nova-2-general" numDigits="1" action="http://myhost.com/app/stashvmail.php">
  <Say voice="female">Hello, thanks for calling, leave a message now</Say>
</Gather>
gather speech, disable smartFormat, enable numerals
<Gather input="speech" smartFormat="no" numerals="yes">
  <Say voice="female">Hello, Say some numbers now</Say>
</Gather>
say audio in the default language and voice
<Response>
  <Say>This will play using the default voice and language associated with the WebResponder system user/domain</Say>
</Response>
say audio in a male or female voice
<Response>
  <Say voice="male">Hello there! How are you?</Say>
  <Say voice="female">Hi! Nice to meet you</Say>
</Response>
say audio in a specified language
<Response>
  <Say language="en-AU">G'day! How's it going?</Say>
</Response>
say audio in a specified language and gendered voice
<Response>
  <Say voice="male" language="es-ES">¡Hola! ¿Cómo estás?</Say>
</Response>
say audio in a specified language and voice ID
<Response>
  <Say voice="pt-BR-Wavenet-C" language="pt-BR">Olá! Como você está?</Say>
</Response>
asynchronous audio stream
<Response>
  <Start>
    <Stream url="wss://example.com/audio">
    </Stream>
  </Start>
  <Say>This will execute after connecting the stream</Say>
</Response>
stop a stream
<Response>
  <Stop>
    <Stream name="mystream" />
  </Stop>
</Response>
Synchronous Bi-directional Streaming
<Connect>
  <Stream url="wss://example.com/audio">
  </Stream>
</Connect>
Web Responders in a Call Trace (v44.1+)
Starting in SNAPsolution v44.1, Web Responders will now show as a call participant in the call trace.
Here is an example testing scenario:
- Create a dial translation for the Web Responder, using the application "To Web".
- Use the "destination" of the above dial translation and set it as a user's forwarding rule.
- Call the user. The following trace should result, showing the Web Responder as the call participant ("POST").

Web Responder Enhanced Security (v44.1+)
There is a new system property, called WebRespSecret, which defines a global secret key used for signing all Web Responder requests. By default, this property is not set, meaning no signature is appended to the request.
There is also a new token, HttpSecret, which facilitates the customization of the signing secret on a per-request basis via the dialrule parameter. This allows for flexibility in scenarios where different secrets are needed for different Web Responders.
Known Limitations
Recording: There is a known limitation for Web Responders where recording currently doesn’t work for the streaming verb if Call Recording is attempted for the Web Responder itself. This is because streaming is connected to the Websocket; the media doesn’t go to the normal relay and is not considered an RTP call. The workaround is to record the leg from the caller or record the connection. This will be addressed in a future release.
Limited Verb Availability: There is a limited set of available verbs. If something else is needed, we recommend using the forward feature.
Forwarding: In order to forward calls while using Web Responders, the call leg must be connected to a subscriber who owns the call. Refer to the “Taking Ownership of the Call” section for more information. There are no plans to change this behavior.
Updated 6 months ago